Making a Lure
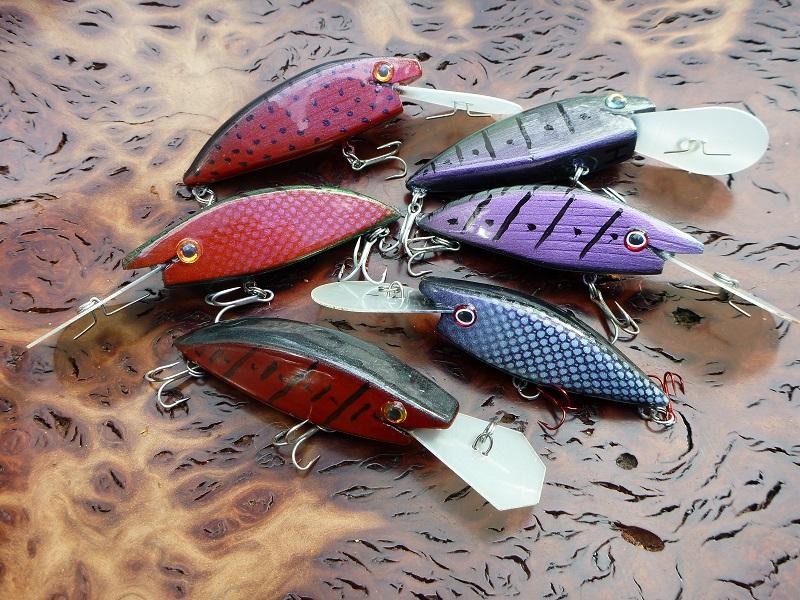
*Cover photo - A mulloway caught on MXB 'Yabby'
Making your own lures is not only fun but its a creative process that teaches patience and perseverance. Although there are thousands of fishing lures out there, I'm sure we all have our favourites that we use more than any other until we are too scared to fish it anymore for fear of losing it. Or it may be a lure that is long out of production and just not available any more.
A few advantages of making your own lures is;
To save money (now this is debatable once you set yourself up with materials and paints, hardware and terminal tackle) but in the long run as long as you don't buy lots of lures while investing money and time in making them as well!!
Satisfaction in creating a lure and catching a fish on something you have created. The time invested in designing and creating a useful lure that fool fish is not easy. However there are so many designs that are already tried and tested that it is probably best to replicate and individualise your favourite lure model and have an aim in mind - floating/sinking, big/small, target fish etc.
A release from stress after work or a source of income for those who wish to produce a range of lures in larger numbers. The transition from 'cottage maker' to commercial lure production requires commitment and financial investment like any business. Keeping this in mind many extremely talented lure makers choose to stay small and supply a niche market or just give away freebies to friends. It really depends on the individual.
To come up with colour patterns, models and styles that commercial makers are not producing. Lures come in so many variations designed for specific purposes that you would think there would be something on the market for everyone. Sadly this is not the case with fishing fads changing with the times. Many makers have cited the reason for making their own lures as being to make a lure that was unavailable to them - it may be anglers in remote regions or access to fishing shops is restricted. But in the age of the internet dedicated lure anglers can find materials and have them delivered to the door from anywhere in the world and create their own
To copy or replicate your favourite old lures that are no longer available is another inspiration for many - this is reflected in the amount of successful designs that are copied - its been done since the dawn of 'lure' time and will continue into the future (the movement from hand made products in timber to plastic moulding in China is the current trend). Timber 'Flopy' copies and Newell 'Kadaitcha' imitations are actually a reflection of how many anglers appreciate the lure - in a way these types of lures evoke a reaction through reputation over time. When looking at vintage USA lures from the 1950's and earlier, the level of craftsmanship and quality is obvious - similarly old Australian collectables from the 1970's, 80's and 90's. The reality is that it is too expensive in the modern age, where we value labour costs differently, to replicate this type of production quality for the same value.
To create your own famous fish catching model. Maybe it is about creating that lure design that is unique and has never been thought of before. Australian lure making has shown a real trend here with interesting designs that have been developed in relative isolation. The Austalian lure market was quite late in adopting lure fishing on the worldwide scale - but once the world lure market opened up through lures finding their way to the other side of the Earth, Aussie inventiveness and ingenuity forged a unique style due to targeting specific native fish that fed in different ways and on different prey.
One of the first things to do is to salvage or purchase some quality timber and then have it milled to the correct thickness. For small amounts you may be able to do this yourself but if you are sourcing raw timber in bulk it will need to be milled after it has cured and dried.
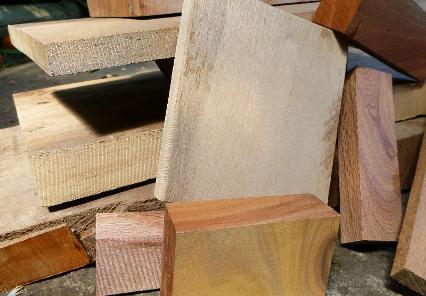
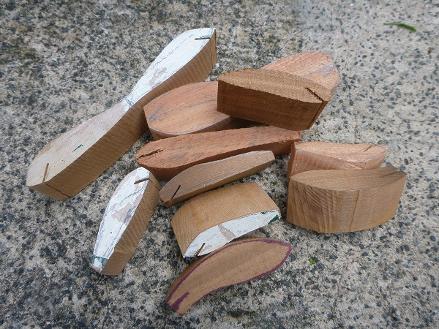
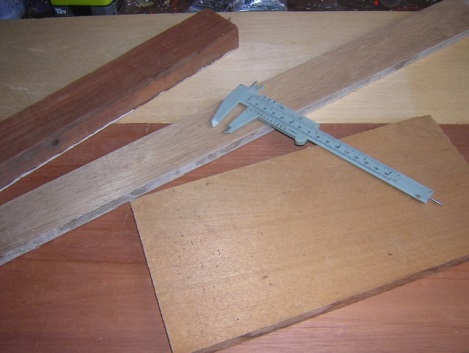
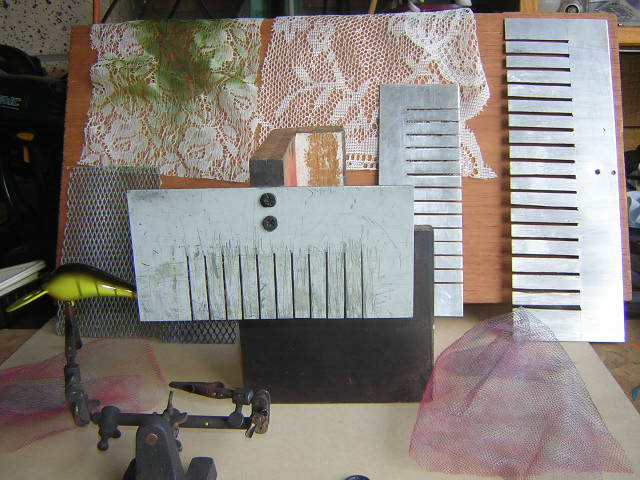
Some examples of salvaged timber that is milled to the correct thickness required (this will vary depending on what type of lure you are making). It may be advantageous to have the timber thickness enough to cut from the block ( 'lure wafers') which will give a more uniform product. However this is not essential and hand carvers will work on a single lure at a time. Don't forget that there is lots of timber around if you look - old doors, timber frames, roof batons, old garden furniture etc etc.
Timber on the right includes white beech, red cedar, yellow cedar, western red cedar and various Proteacea timbers (see Timber database)
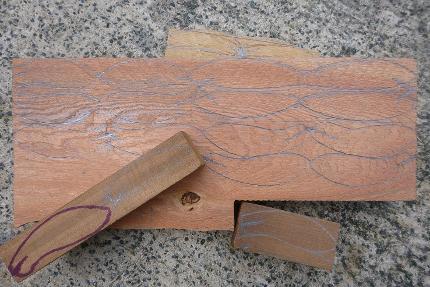
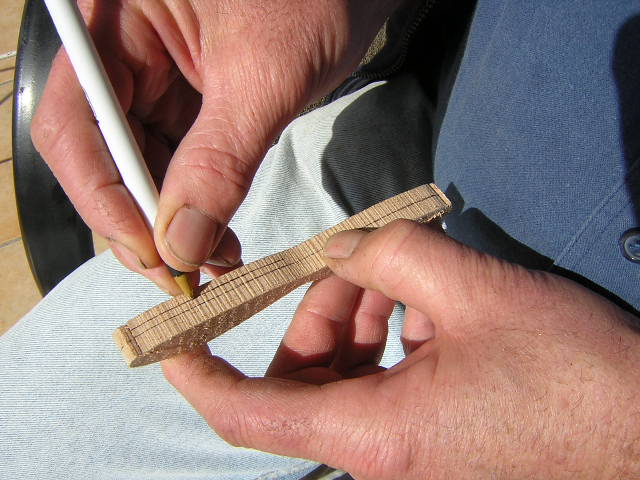
Once you have selected a suitable timber or lure making material it is probably a good idea to mark out a template of the lure you wish to cut out. This could be done with a small hand saw of some description or with some form of machinery.
Marking out blanks is really an essential part of the lure making process. Cutting an accurate timber blank means you have less sanding and hand shaping to do. This can of course be done a few different ways including 'replicating' lure blanks with a purpose built machine however most lure makers start by marking out a blank on the chosen timber and then working from there. Try to minimise wastage by marking templates carefully side by side or in reverse.
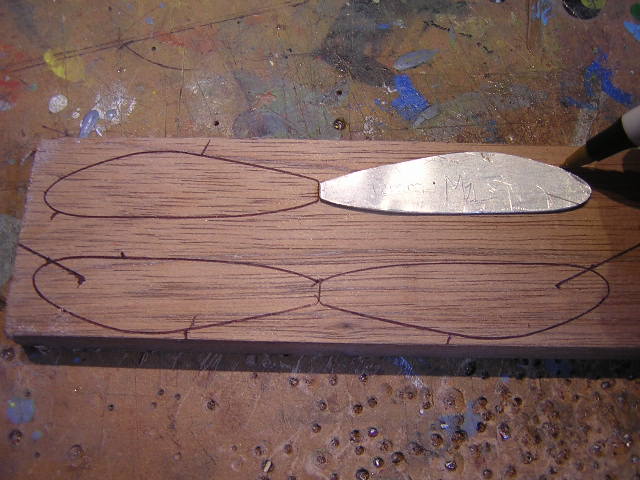
Right photo shows some examples of MXB lures marked onto some King Billy Pine and some small blocks of old Western Red Cedar.
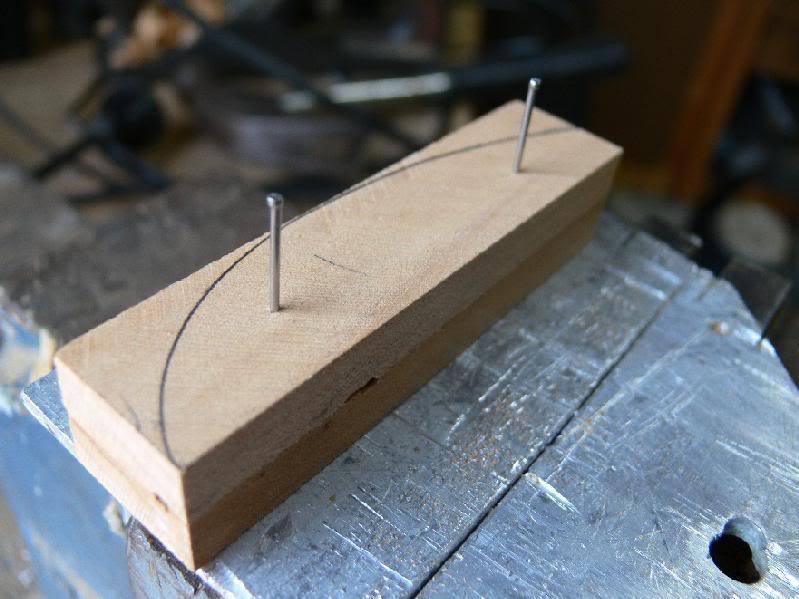
The next step is to start marking up the blocks of timber ready for cutting and shaping. This will include guidelines for carving, centre marks on blanks to help with carving, or segments for later cutting of individual blanks. The cutting process can then start.
To get a uniform product and replicate the same lure over and over, it is important to have accurate measurements. After measuring and marking the lure blanks can then be cut using a scroll saw or similar.
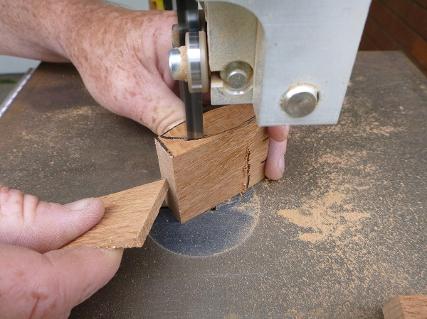
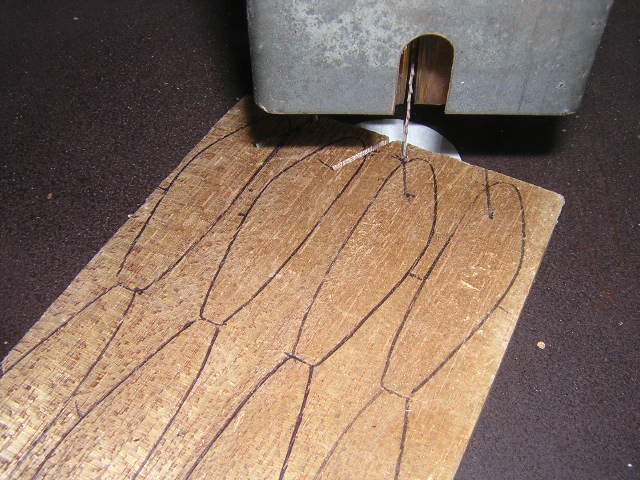
Example on the right shows some Hobbled 'Weaponhead' lure blanks being cut in silky oak from rectangular blocks which will give 3 lures per block. The profile of the lure is then cut out on each block as shown below.
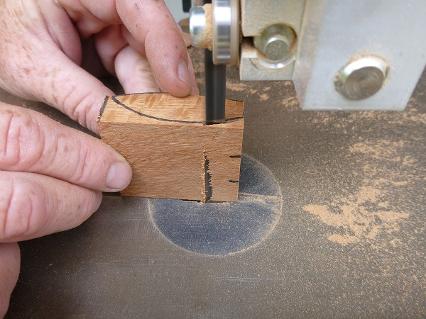
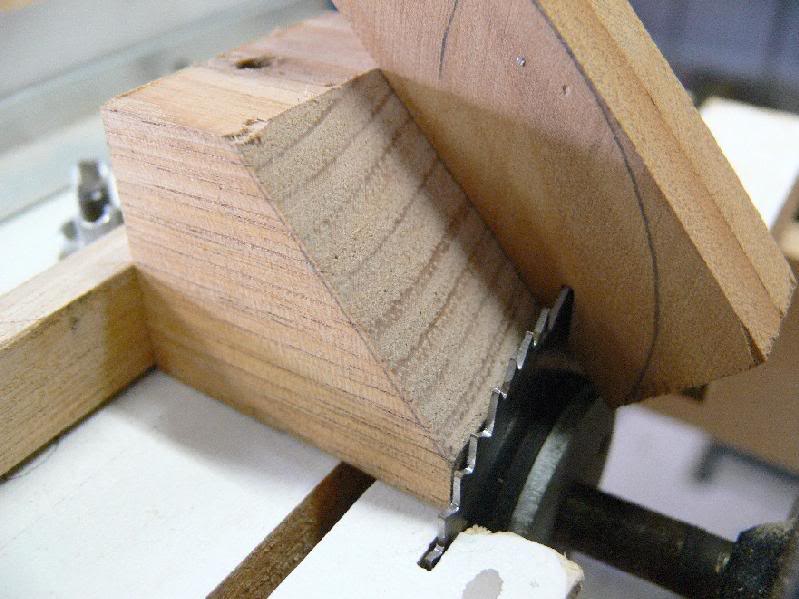
Example on right shows guiding the block through carefully with an off cut of timber - remember safe work practices at all times
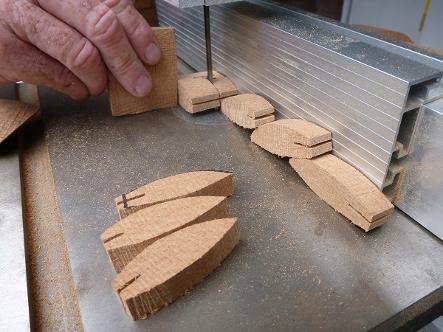
It is important at this stage while the blank is cut square to think about any bib slots that need to be cut as it is probably best practice to cut them in at this stage once the lure blank profile is cut from the block. You will also need to determine what thickness to cut the slot as to whether you are using 1mm, 1.5mm or 2mm polycarbonate or alloy metal bibs. After this you are ready to cut out the individual lure blanks
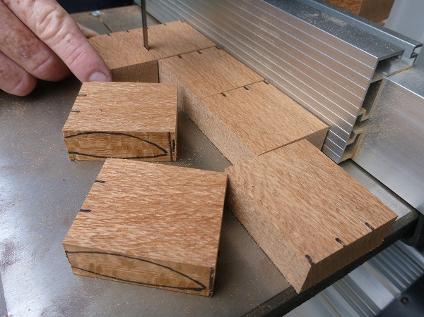
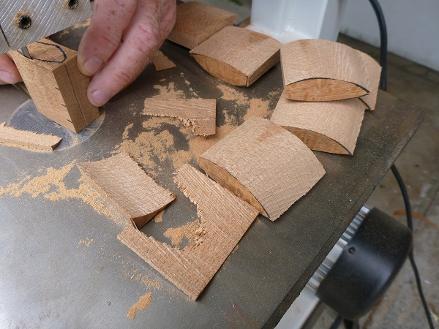
Depending on the density of the timber you are using you may need to cut curves in steps like in photo to the right. After this the bib slot is cut and then individual blanks can be cut like 'wafers' or 'biscuits'.
The photo below shows the individual blanks now ready for hand or machinery shaping with bib slots pre cut.
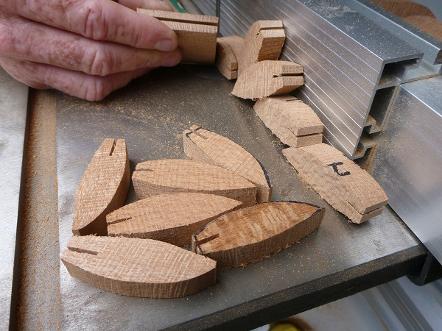
Above shows some MXB Lure blanks ready for sanding lines and then hand shaping.
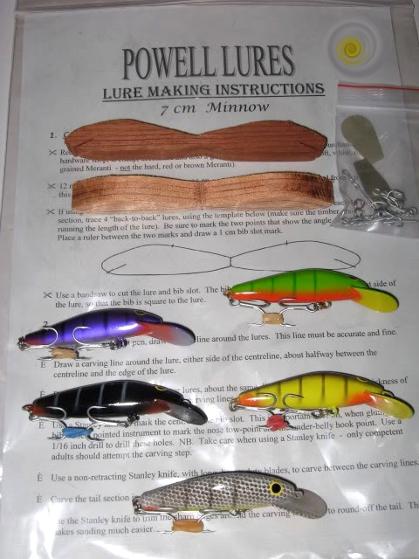
Handcarving Lures: Travers Powell
Lure Making - The 7cm minnow:
Step 1 : Preparing the lure blank;
1. Select the timber. White Beech and Brown Beech are the best
carving timbers. Australian Red Cedar is
also an excellent carving timber. Other common timbers, used for carving lures,
include Jelutong, Meranti (the white, soft Meranti) and Paulownia. Either purchase timber that is the desired thickness
or use a ‘thicknesser/planer’ to plane the timber to the desired thickness.
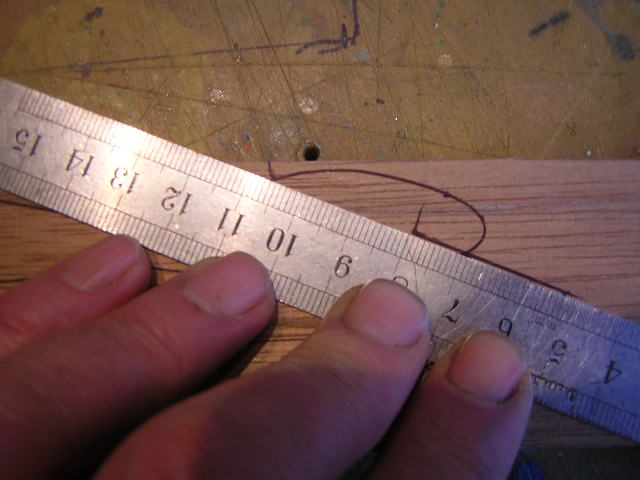
3. Use a ruler to mark where the bib slot needs to be cut. 1cm bib slot for the 7cm Minnow.
5. Cut the lure out.
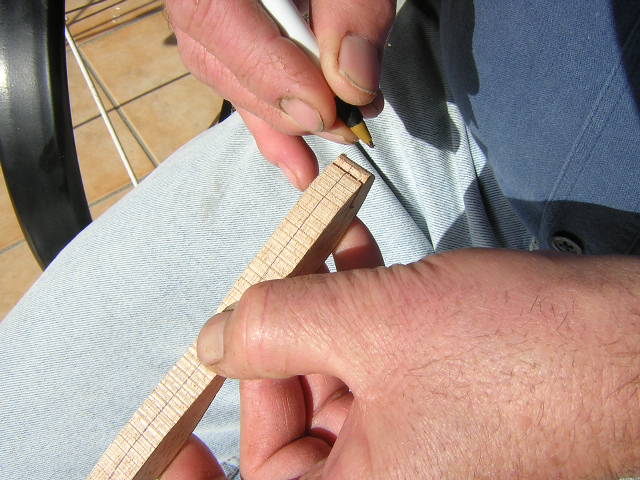
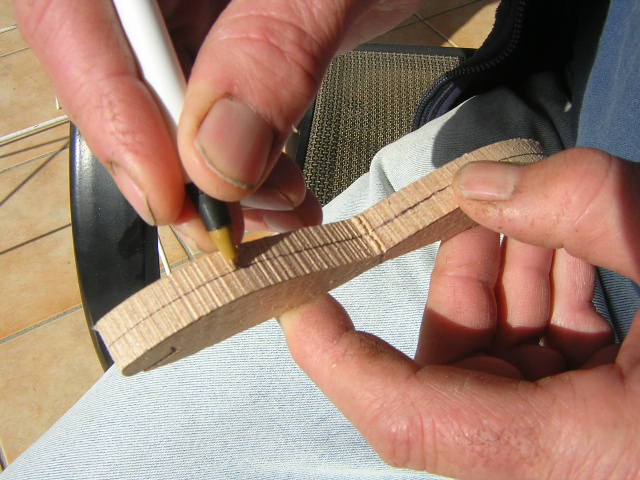
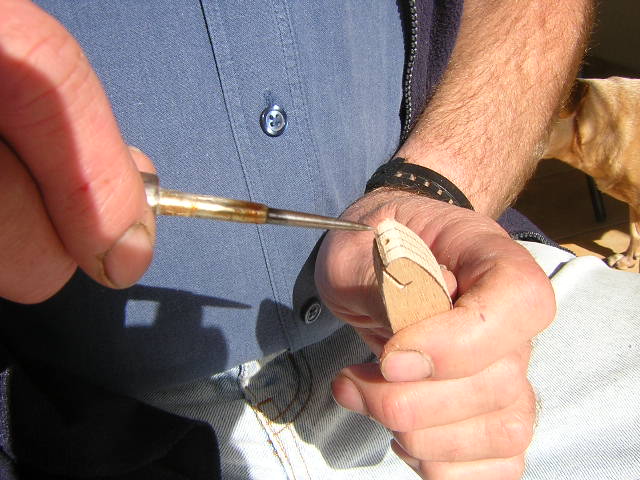
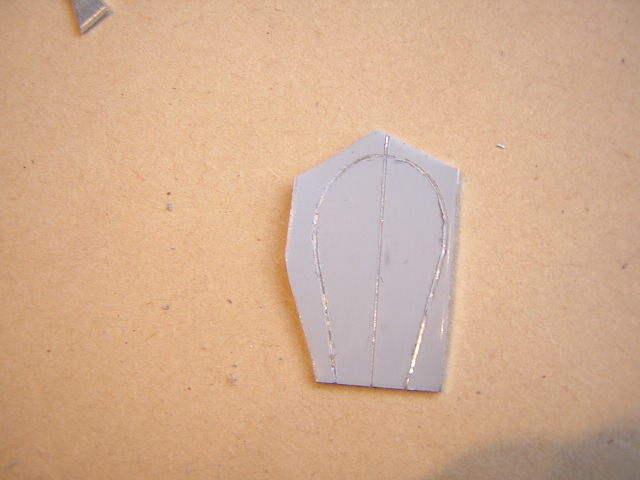
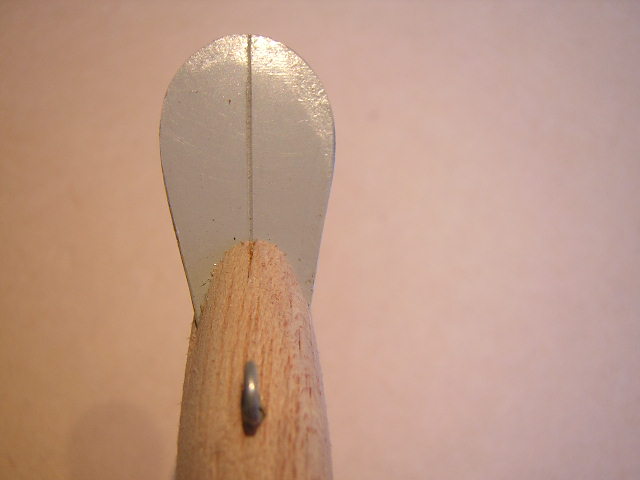
6. Draw the centre line all the way around the lure. Start on the top of the lure until you find the exact centre (the top centre line is not important) by running your middle finger on the side of the lure and the pen in the middle of the lure. Draw a short line from one side of the lure, then from the other side – if you are in the middle, you will only have one line.When you have dead centre, draw the centre line on the undersuface of the lure blank from both sides of the lure – this is the MOST IMPORTANT part of the lure making process.
8. Use the Stanley knife to mark the centre line, at the bib slot. This allows you to locate the centre line, after the lure has been carved and sanded, to centre the bib at gluing time.
Step 2: Carving the Lure
Timber selection: White Beech, Brown Beech, Australian Red Cedar and Meranti. Vernier callipers can be used to measure thickness of timber.The 7cm Minnow is made from 12 mm thick Meranti or Australian Red Cedar.
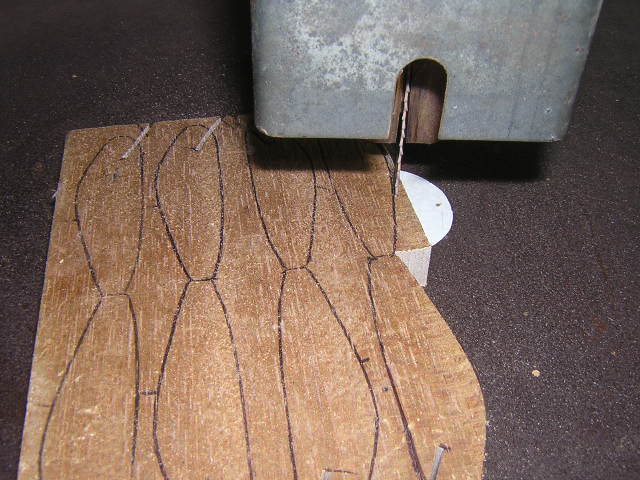
2. Select the lure templates to draw the lure shape on the timber. Be sure to mark the bib slot position.
4. Cut the bib slots before you cut out
the individual lure blanks. This ensures
that the timber is sitting dead flat on the bandsaw bench, resulting in the bib
slot being ‘square’ to the edge of the bench.
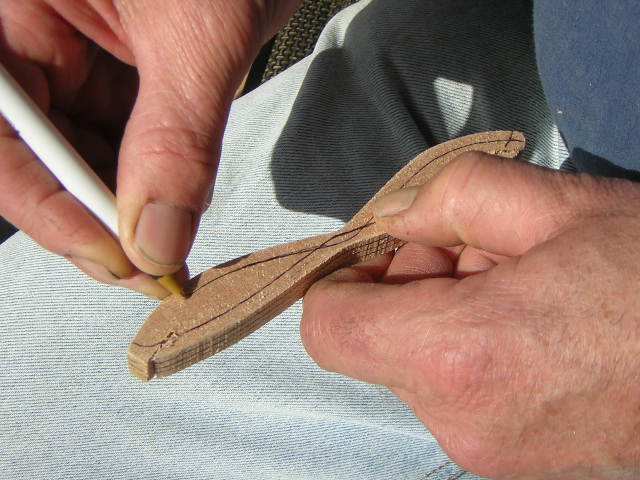
7. Draw the carving lines around the top and bottom of the lure, they will be half way between the centre line and the edge of lure blank. On the sides of the lure, the carving line will be about the thickness of the tail section.
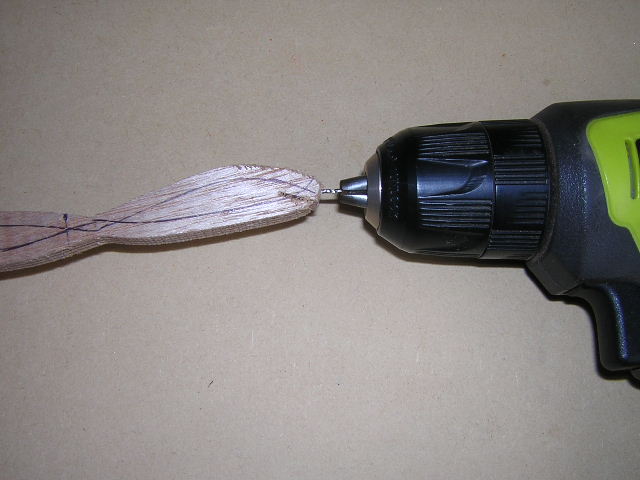
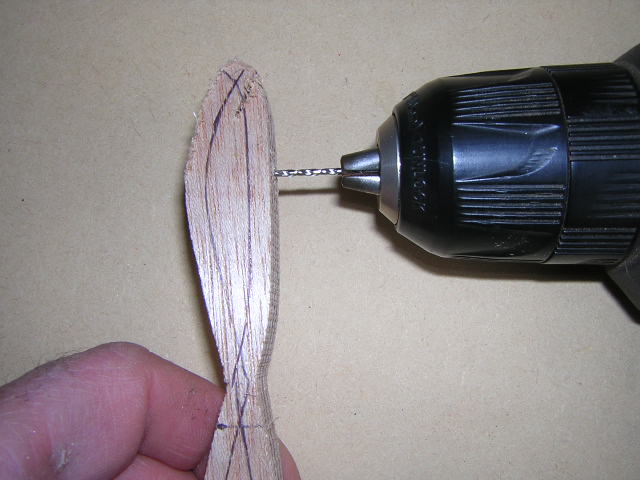
9. Use a sharp scribe to mark the location of the nose and
underbelly eyelets. Drill the eyelet
holes. A 1/16“
drill bit is perfect for the 0.9mm wire used in the 7cm Minnow.
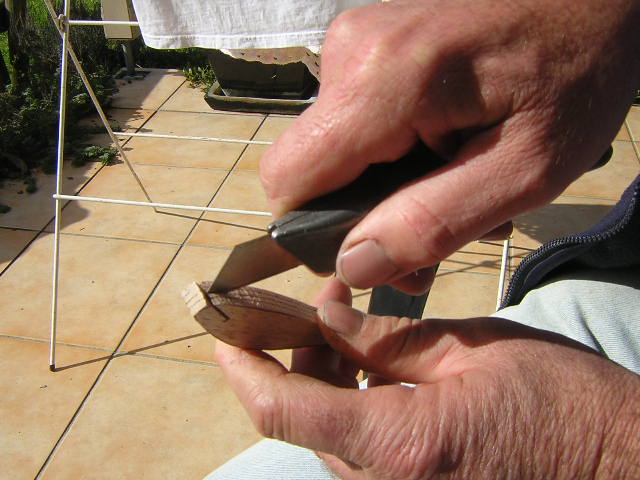
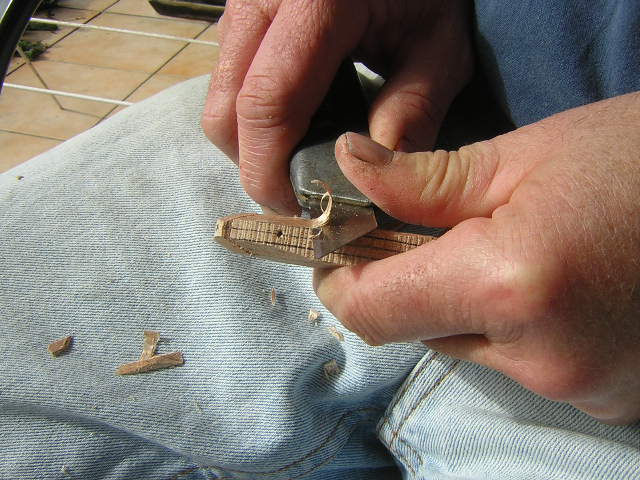
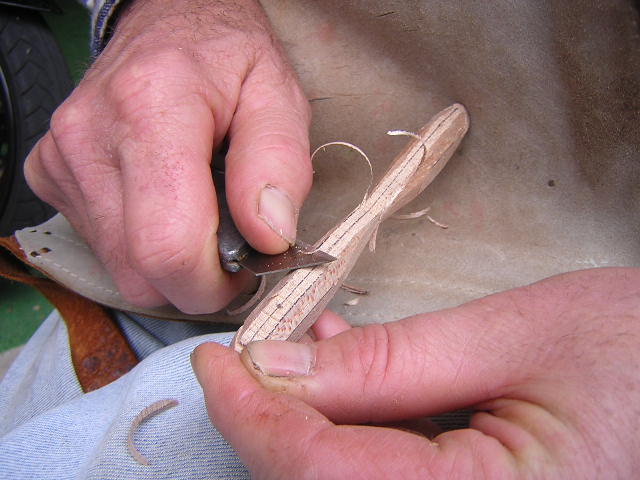
10. Carve between the carving lines, all the way around both blanks. Use a non-retractable Stanley knife (or similar) with long, heavy duty blades. Take great care when carving. Don’t carve ‘with the grain’ or the timber will split off – cut across the grain.

12. Lightly trim the edges around the carving lines. This makes it easier to sand the lure.
14. After sanding, cut the 2 lure blanks apart and drill the rear eyelet hole.
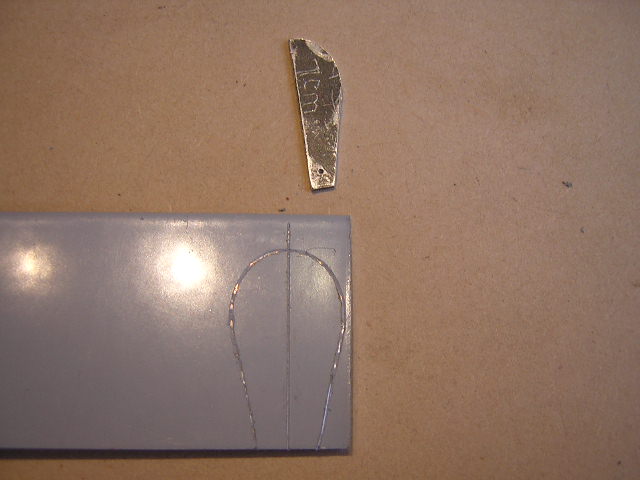
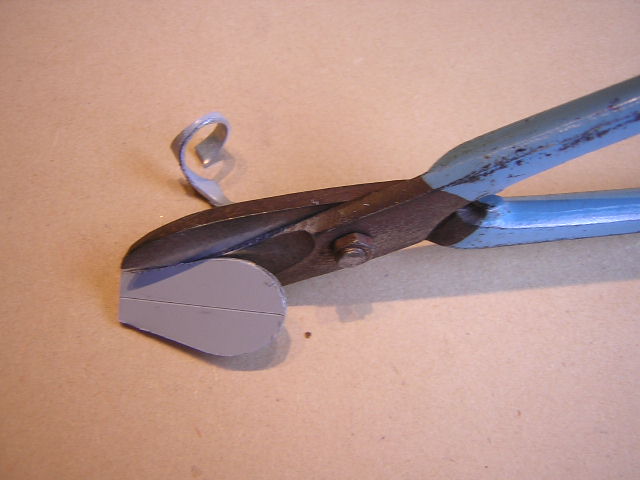
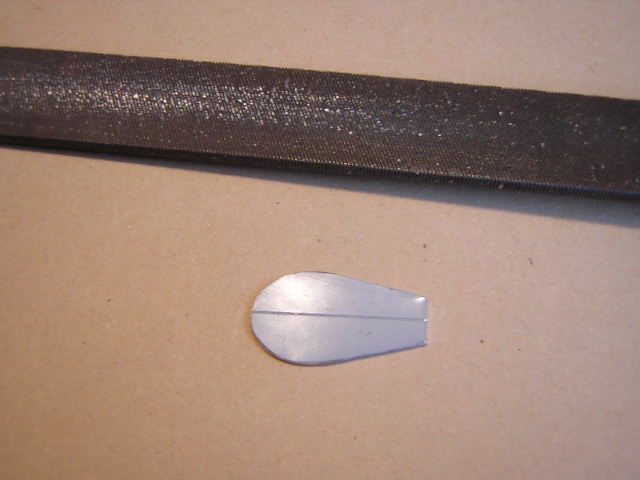
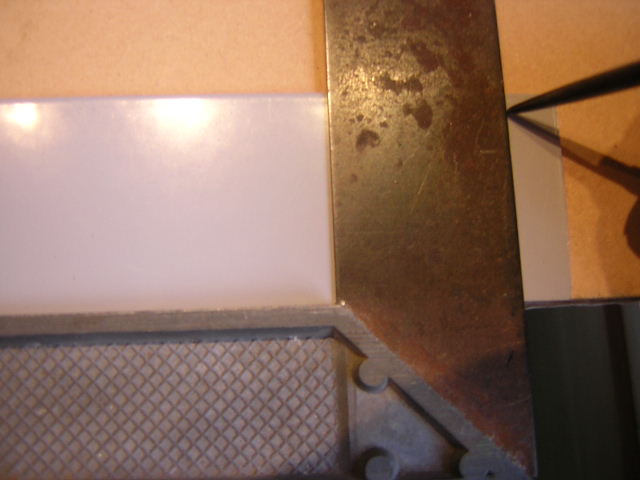
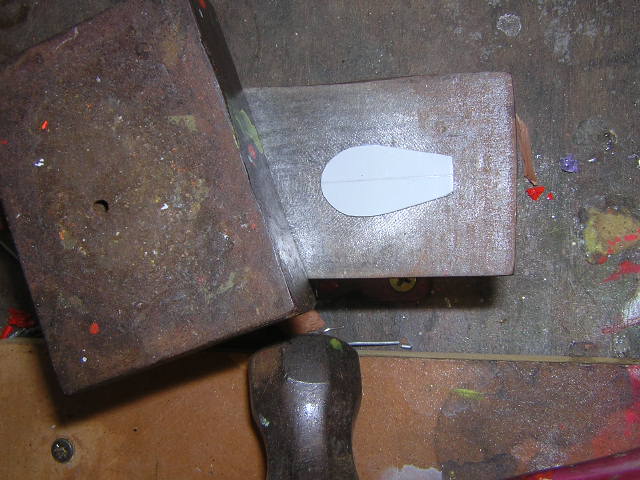
15. Cutting the bib. First mark a line 90o to the edge of the aluminium (use 1.2mm thick aluminium). Then use the bib template to draw the bib shape (a ‘half’ bib template is used to ensure the bib is symmetrical). Roughly cut the aluminium about 2-3 mm away from the lines – this makes it easier to cut around the curved line. Then use a small pair of tin snips to cut the bib shape.
16. Make
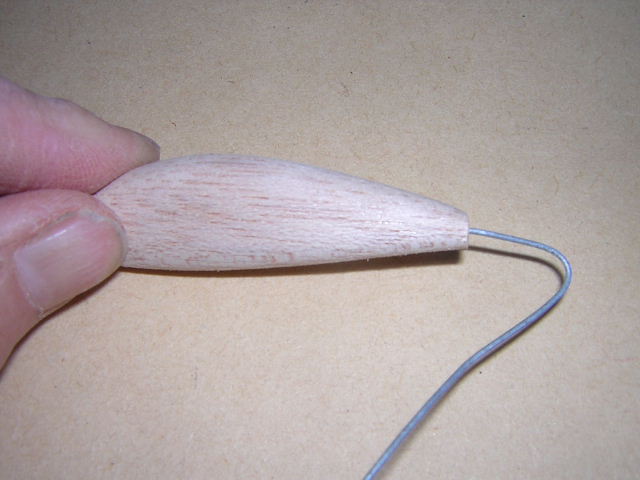
the wire eyelets (hook hangers). For
a 1/16“ drill hole, use 0.9mm stainless steel or
galvanised tie wire. Push the wire into
the hole and bend it about 1 cm out from the lure. Remove the wire and bend the wire so the 2
pieces are ‘parallel’. Cut the long end.
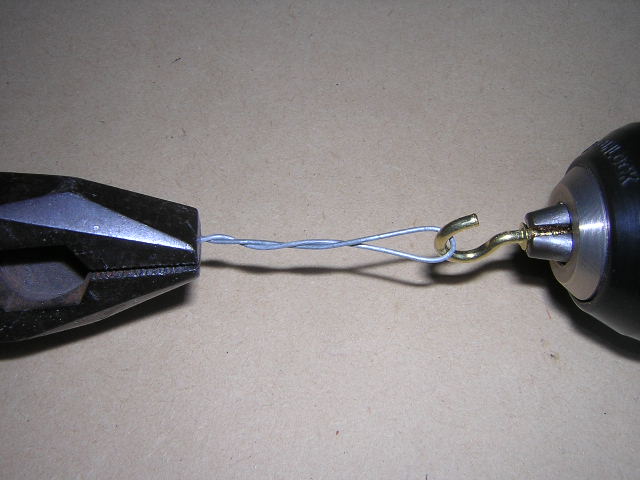
Hold the cut ends tightly with pliers and use a drill and cup hook to
twist the wires. Alternatively, twist
the wire, by hand, around a nail. Cut
twisted wire to the correct length.
Next, glue in the bib. Use a piece of wire to coat the inside of the bib slot with glue. Cover the lower section of the bib (both sides) with glue. Align the centre line of the bib with the centre line cut on the lure. Push the bib into the slot and sight along the lure to make sure the bib is sitting straight. Clean off excess glue and fill the edges of the bib slot, if necessary.
Sand off the excess glue, when dry. The lure is now ready for undercoating
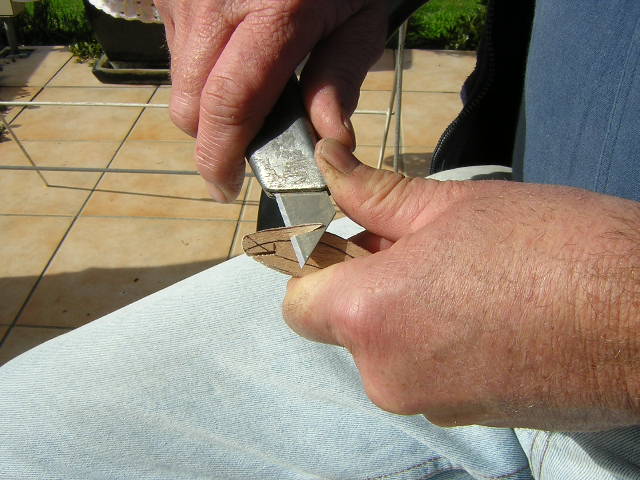
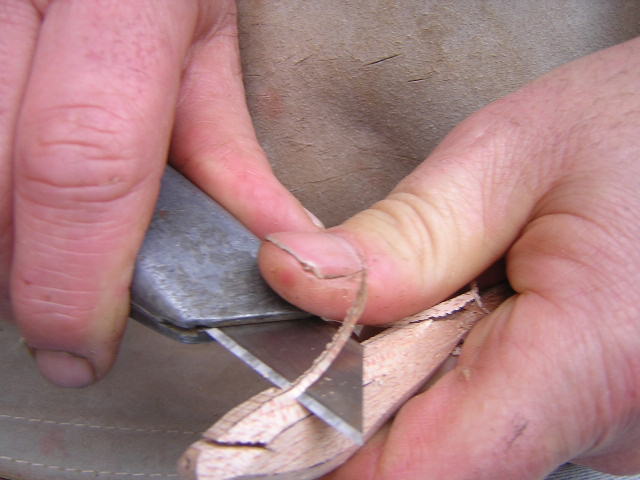
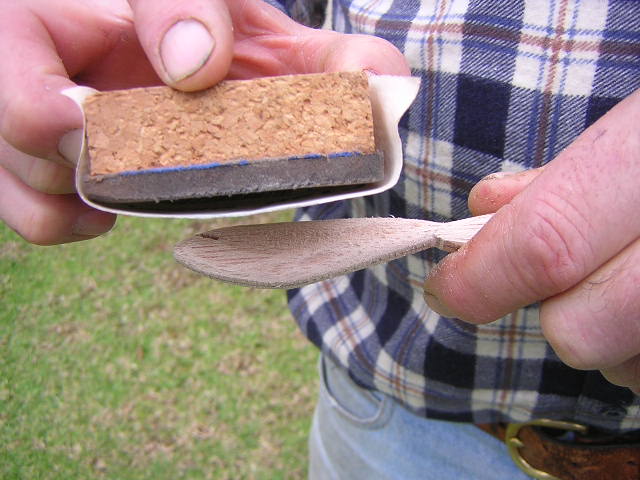
11. Cut the tail section in, being very careful not to cut yourself – a leather nail bag provides good protection. Start the cut about a 1/3rd of the lure length from the tail.

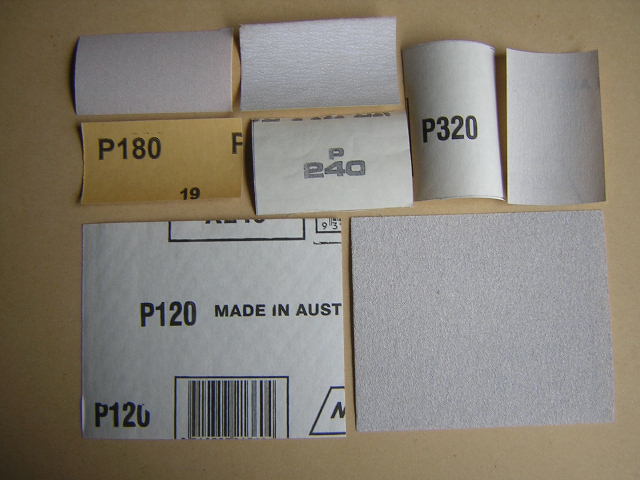
13. Use 120 grit aluminium oxide sandpaper and a sanding block to sand the lure to shape. Use a lot of wrist action and sand around and around the lure, to get a rounded profile. Then sand with 180 grit and 240 grit paper for a smooth finish.
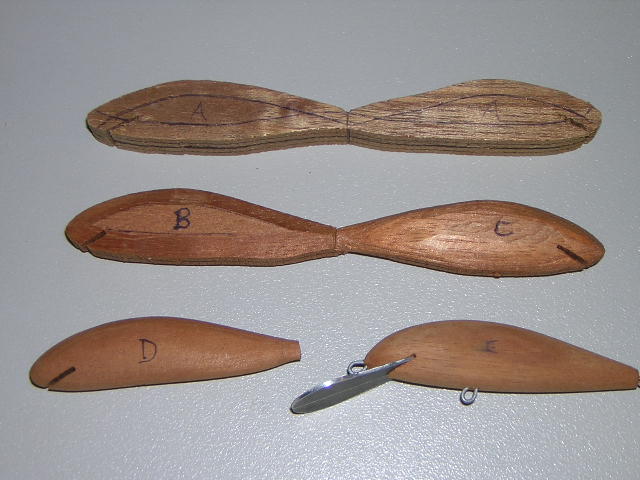
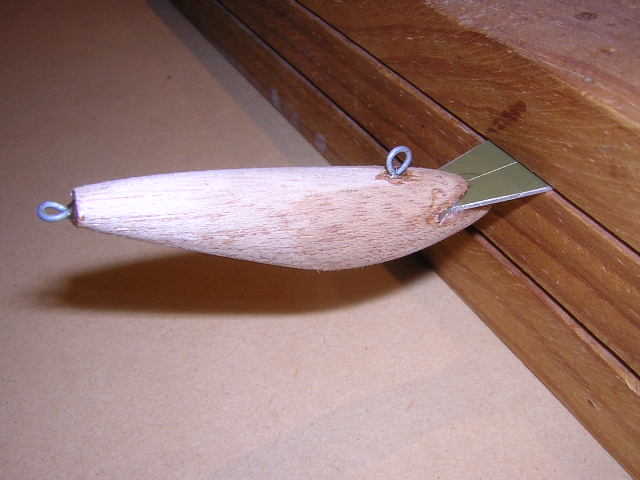
Steps in the carving process shown on left:
(A) Lure blank with carving lines
(B) Carve between the carving lines.
(C) Cut in the tail section and trim edges.
(D) Lure after sanding a cutting the double blank in half.
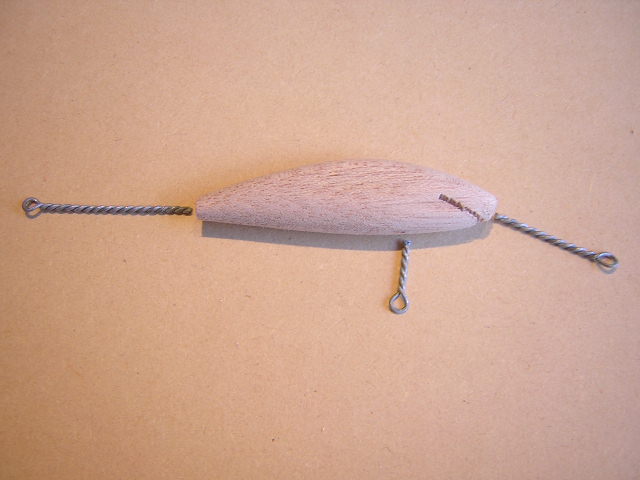
(E)Lure with bib and eyelets fitted.
File the bib to get smooth edges and a symmetrical shape. Flatten the bib between two pieces of steel.
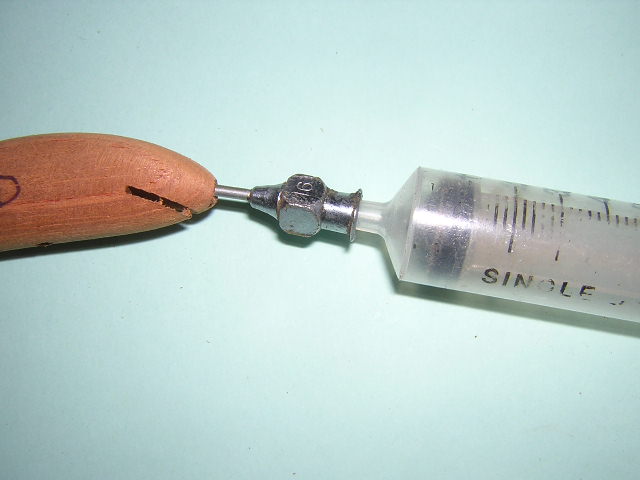
17. Glue the lure together. Fill the eyelet holes with Super Strength Araldite, or similar glue. A syringe, with a 16 gauge vaccinating needle is suitable for a 1/16“ drill hole. Alternatively, use a piece of wire to poke glue into the hole. Cover the twisted wire and push it into the hole. Clean up excess glue.
Place the lure in a position to allow the glue to dry and set.
Step 3 - Painting the Lure:
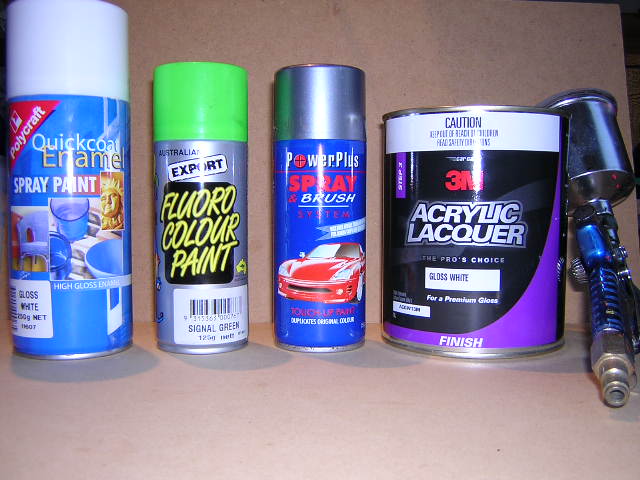
18. Undercoating the lure. The simplest method to paint the lure is to buy pressure pack enamel undercoat and paint, from a department or hardware store. It’s cheap and it dries hard. Make sure that you read the instructions, and follow the instructions, particularly when it comes to recoating with additional coats of paint.
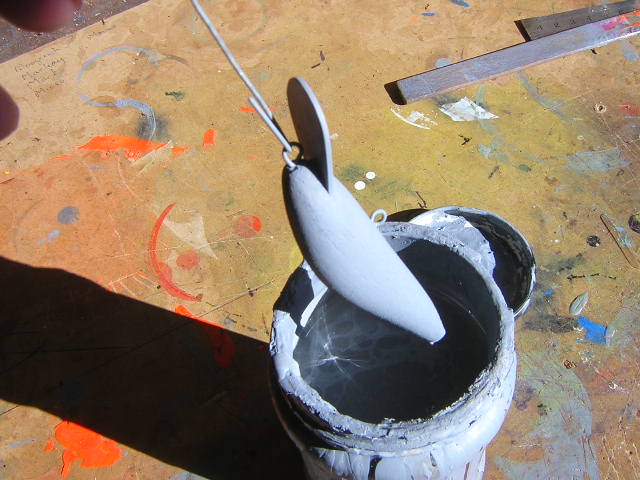
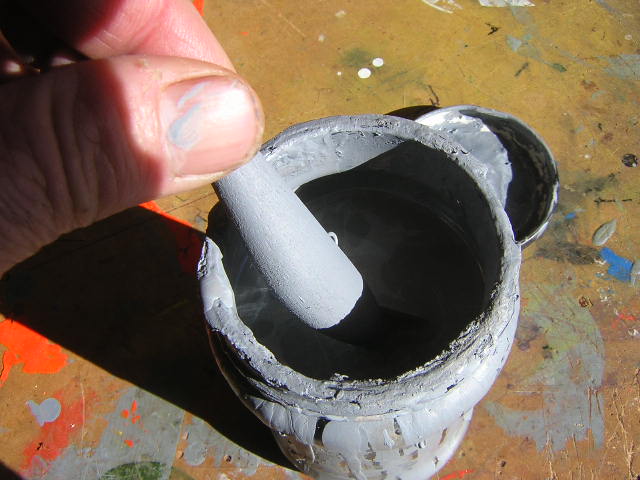
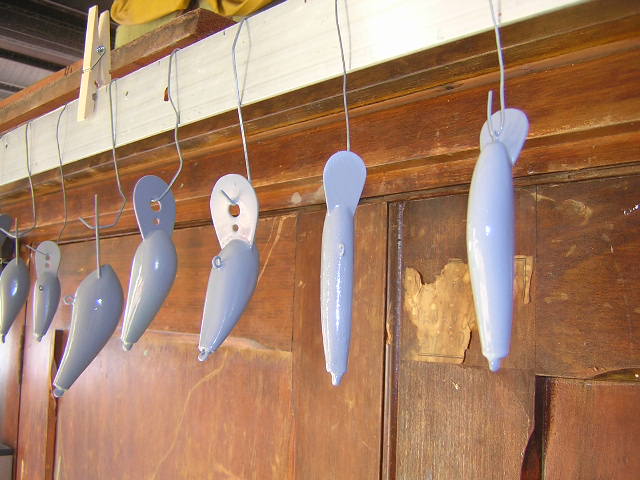
With my lures, I use acrylic lacquers. Acrylic lacquers dry fast and can be sprayed very fine. To undercoat, I dip my lures into thinned Primer Filler Acrylic Lacquer undercoat, then hang them up to dry for a day. The lures get 5 coats of the undercoat over a 5 day period.
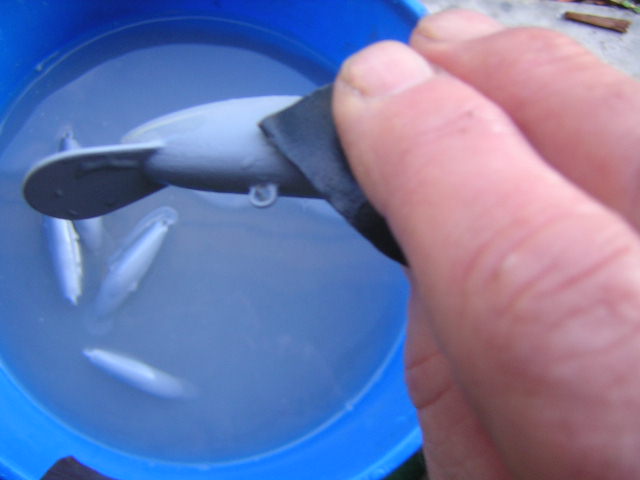
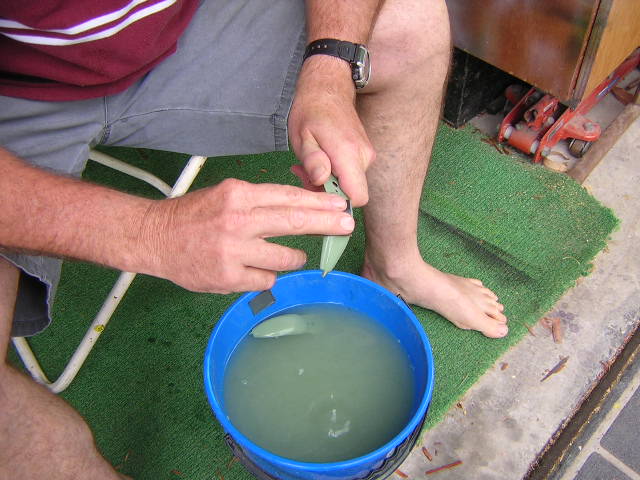
19. Tuning the lure. I always tank test the lure before sanding and painting, to avoid affecting the final paint job. After the undercoat is dry, swim the lure in a pool or bathtub to check that it is running straight and has sufficient action. If the lure is leaning to one side, bend the nose eyelet slightly in the direction of the lean (eg. if the lure is leaning to the left, bend the nose eyelet slightly to the left). If the lure is not wobbling, or not wobbling enough, bend the nose eyelet down toward the bib.
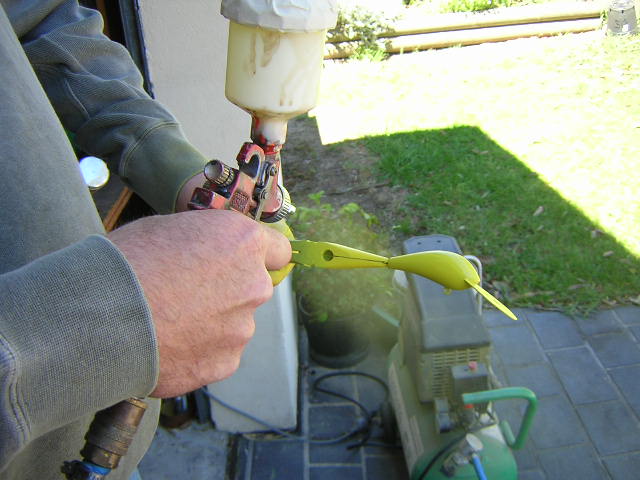
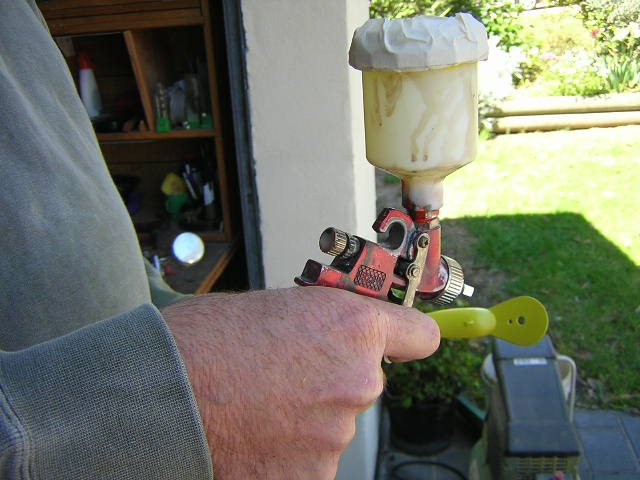
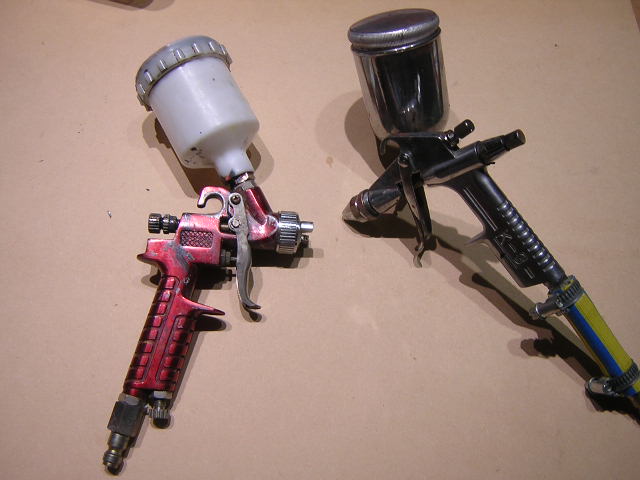
I use a small, gravity feed touch-up gun and a compressor to spray acrylic lacquer.
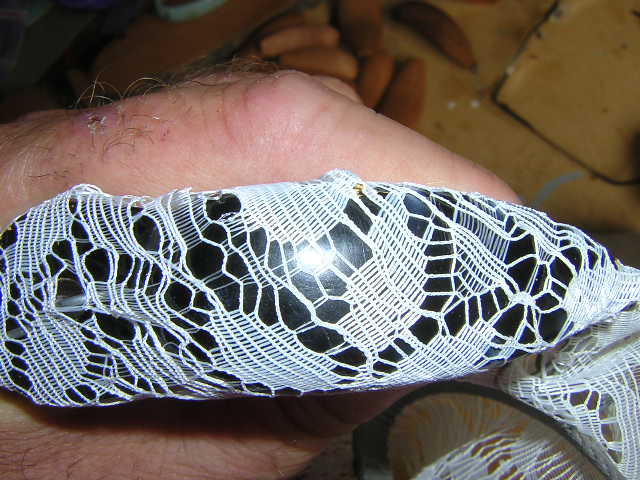
22. Stripes, patterns and scales. Painting vertical stripes on the lure is simple. All you need is a piece of aluminium, plastic or cardboard with some slots cut in it. Place the lure behind the slotted material and spray. Curtain material is great for patterns – the difficult bit is removing the curtain material without smudging the paint. Scales are easily applied by wrapping tulle around the lure and then spraying the lure
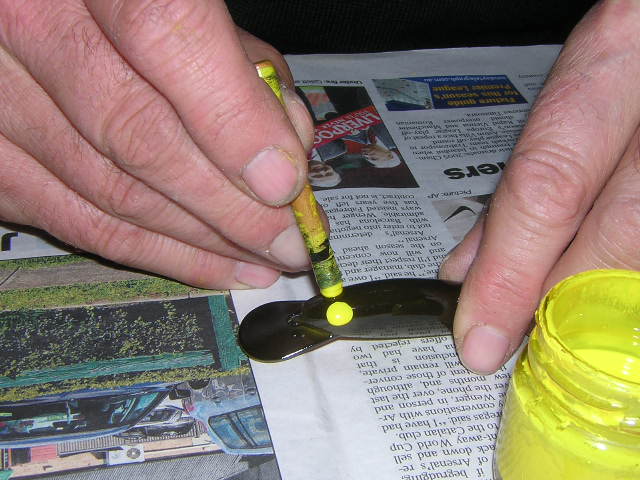
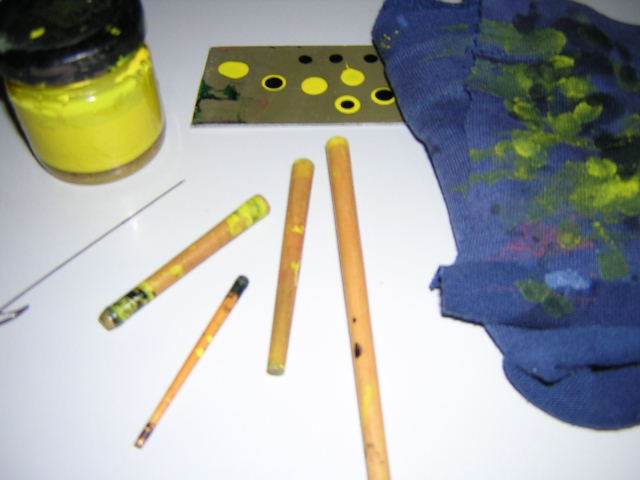
24. Dotting the eyes. A small piece of dowel or a paint brush handle, in different diameters, is all you need to dot the eyes. The paint will need to be a bit thicker than that used for spraying. Test the eye dot on a piece of plastic before dotting eyes on your lures.
20. Wet and Dry sanding the undercoated lure. Use 600 grit Wet and Dry, with a bucket of water, or running water, to gently sand the undercoat to a smooth finish. Be careful not to sand through the undercoat. After sanding, wash the lures in clean water and hang up to dry.
21. Paint the lures. As mentioned earlier, pressure pack enamel is the easiest and cheapest paint to use. Acrylic lacquer, in pressure packs, will give quicker drying times than using enamel, and can be purchased at most automotive shops
When spraying the lures, make sure that you are not in a confined area, where the paint fumes make be a health problem. If you are concerned about breathing the spay vapour, you should wear an appropriate respirator.
For the best results with painting, don’t try to paint your lures on humid days. The acrylic lacquer will absorb moisture from the air and cause the paint to go dull or ‘milky’, giving a very poor finish. Paint only on warm days, when the humidity is less than 60%.
Apply the base-colour paint in light even coats. A second coat of acrylic lacquer can be applied within minutes of the first coat. If you are using pressure pack enamels, make sure that you follow the instructions for recoating.
23. Clear coat finish. It is not necessary to apply a clear coat to your lures, but it does make them look much better and gives them extra protection. Be careful when applying the clear coat – if you apply too much, and it runs, it may drag the other paint with it. So, like the application of the base colour coat – lots of light coats.
Making a Through Wired Lure:
The Rayna Way
'I
see a lot of guys make through wire lures, understandable when I see
some of the pictures of the fish you catch there. I don't normally
bother for trout but if I was going after Cod or Barramundi over here, "Through Wire" certainly would be an advantage. This
is how I have been doing it for about 30years (with a 10 year break
until recently) but it is by no means the only way, as you can see from
this great forum and others. Some of this will be obvious and mundane to
the seasoned builder, but it could turn the light on for guys just
starting out, so bare with us. Take what you like and adapt it to what
you need and by all means, have fun doing it.
I
don't think there is anything new here, but because of the sizes I make
3" -2"and I
have been doing through wire a bit different, and for some this may be
more accurate and quicker. These
sizes are only what I use, they can be expanded or contracted to suit the
size lures you make. It sounds complicated but once I am set up I can
cut and rout 10 - 12 lures in about 15 min (not including sanding and
wire harness), these will keep me busy for months.'
Step 1:
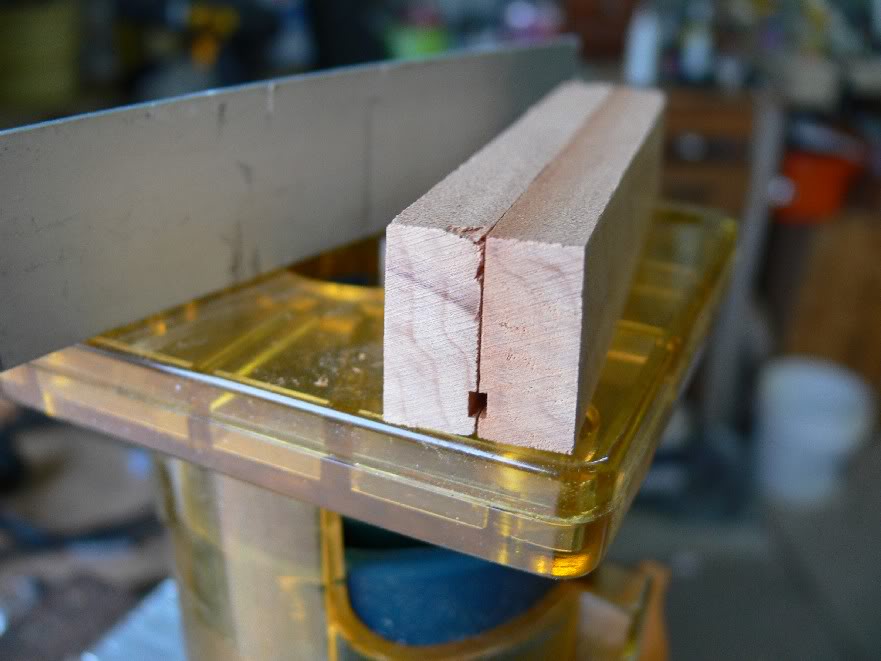
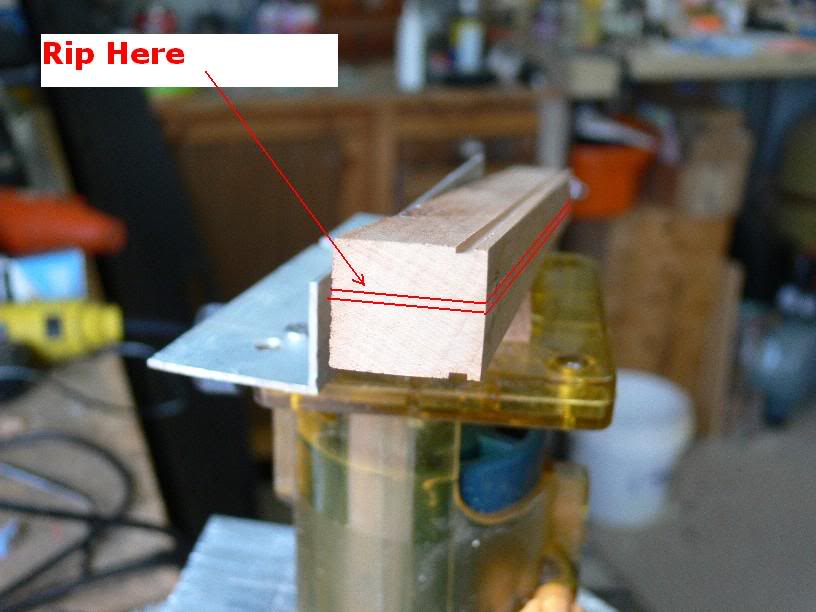
First I get a 20mm x 20mm length of timber and rout a 3mm wide and about 1.5mm deep groove (this 1.5mm, would be about 1/2 width of a through wire harness thickness), the entire length of a suitable length piece of timber on both sides. Length is up to you but I usually do about 1 meter, which gives me about 10-12 lures @ 80mm. If you want to add weight (lead wire etc) to your lures, you should allow more width for this, so maybe use a wider bit.
Step 2:
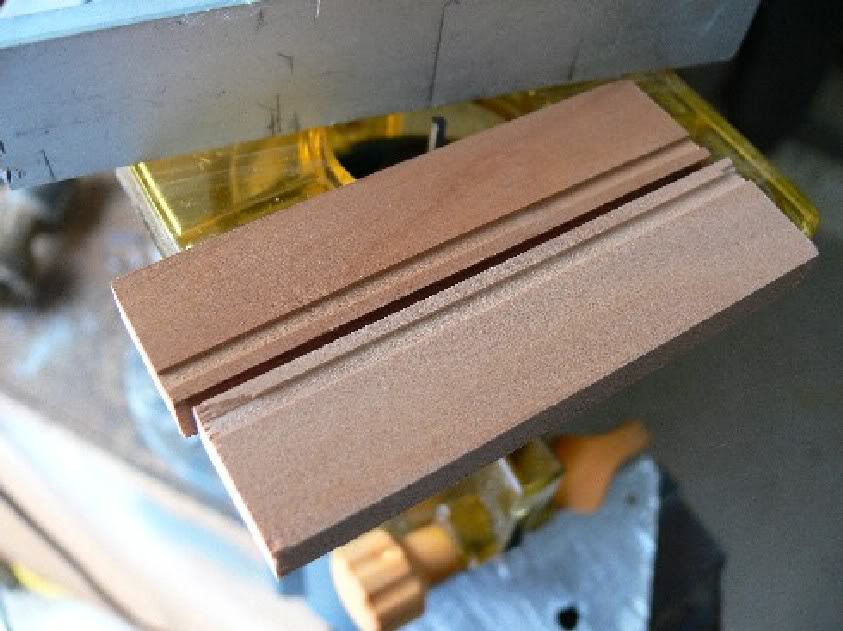
I then put this timber through a table saw and cut it length ways, slightly less then half width (8mm), this leaves the off cut slightly wider (9mm), the blade is 3mm wide. I then put the off cut through (routed edge on fence) and shave off the extra width (about 1mm), this way you finish up with both sides exactly the same width and saves fiddling around trying to cut dead centre.Put
these two sticks together and cut with a drop saw, hand saw, or hack
saw - dock off to slightly longer than your required length, which for
me
is a bit longer than the finished lure (80mm). Get the router going
again and set up some stops (I use old clothes peg springs) and rout the
slot for the bottom hanger/hangers (same depth same width). Because
each side is a reverse of the other, you will need to clamp on a R/hand
and L/hand stop here. Obviously the distance from the lip end to the
first hook hanger should be approximately the same for both pieces,
don't worry about the back end, any extra can be sanded off later.--
*Today I would just cut this bottom hanger slot out with a Stanley knife
Step 4:
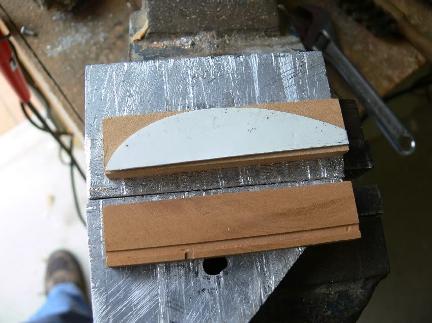
I
make my profiles out of 1mm sheet aluminum and have been using the same
ones for years (it's a Jig), or you can stick on printed paper lure
profiles - one side should do if all your sander beds etc are square, if
not draw/glue your lure profile on both sides (of course noteing where
the square lip end is and the routed part for the bottom hook hanger/s).
If you want to make an aluminum profile, just stick your paper one on an
Al sheet, roughly cut out with snips and then put it on the sander to
finish it off, sanders eat aluminum.
Step 5:
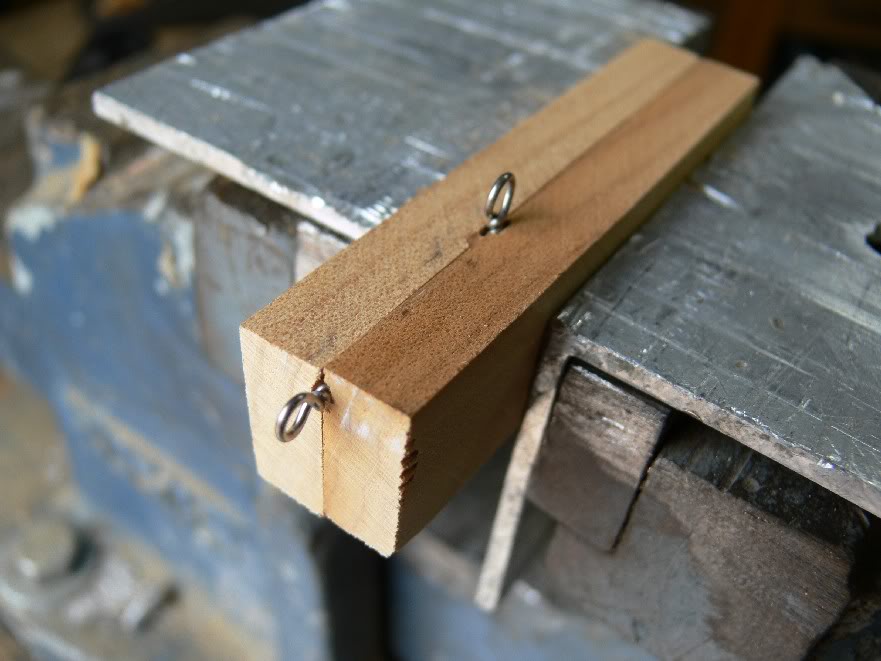
Check that your wire harness fits snugly in the routed grooves, not loose, if it is loose just sand (within reason) a bit off each face until it is snug to tight, when you glue and clamp the halves later, life will be so much easier if the harness is a good snug fit.
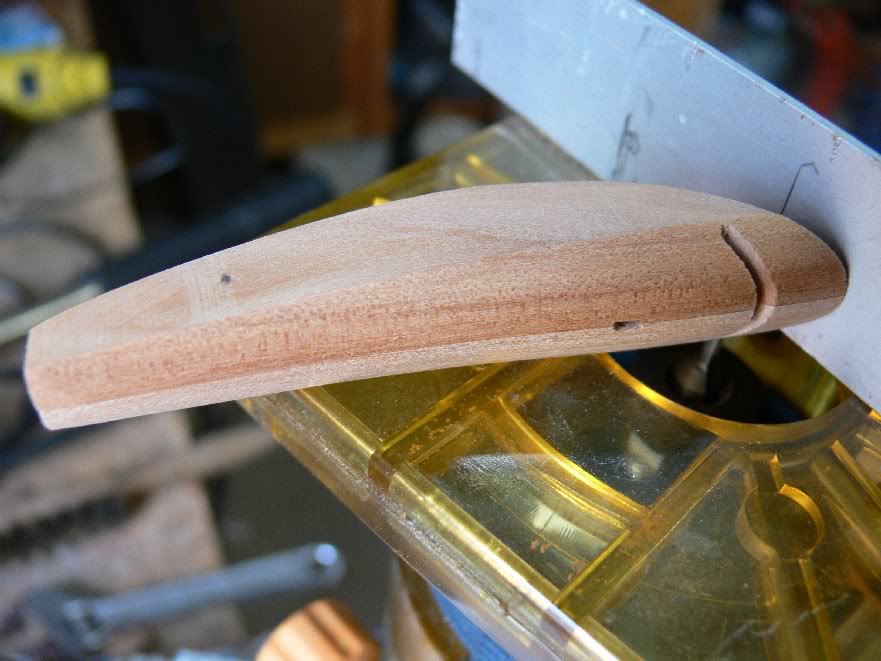
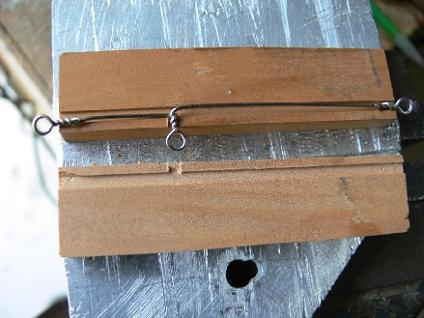
I now have two halves (8mm x 20mm x 80)), place the routed edges together, the bottom hook hanger slots should approximately line up and the lip end should be square. Now you don't have to align with dowels etc. Get the finest panel pins (fine nails) you can find, for me these would be about 1mm x 12mm long (enough to pass through the top half and about 4mm into the second half), square everything up and nail the two pieces together (without wire harness), nailing about 1/3 from each end or where you know the saw blade (for lip slot) will not hit it, or where you want to drill holes for eyes etc. If possible don't pre-drill these pin holes. Now if everything was flush and square, you should get a nice tight join.
Step 6:
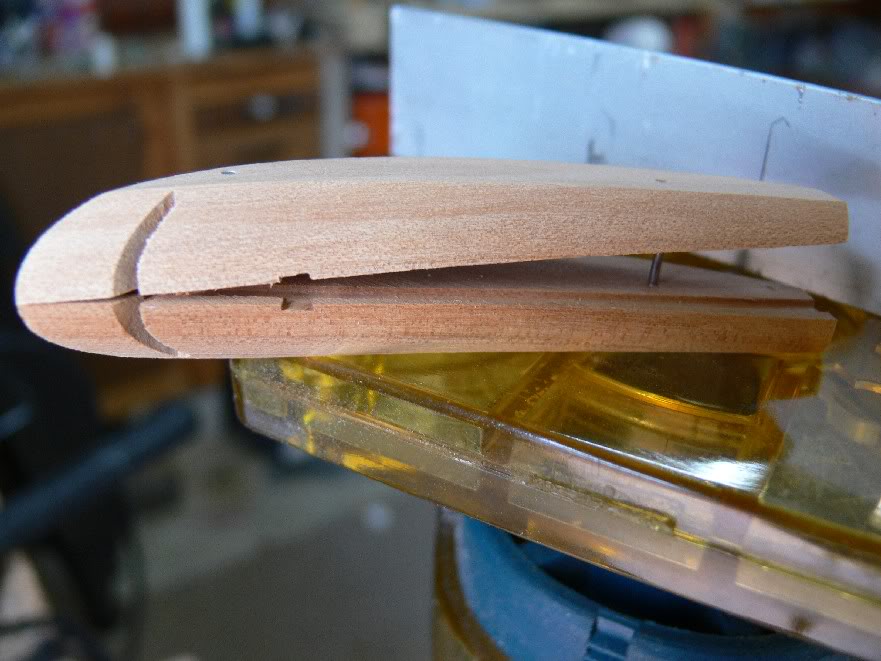
Now cut the lip slot, this is where you're blank, being square and centered, really pays off. Either use a tenon saw, hack saw, band saw, circular saw, whatever rocks your bait, I use a very fine home made circular saw blade, hooked up to a sewing machine motor, the slot is very fine @ 1mm wide, that's the thickness of the Poly carbonate bibs I use. For some of these bigger lures you could use an adze, and as long as it is square, finish up with a great job. Whatever you use, square the blade to the lure or use a set square to draw a line. Again I use jigs for about three different lip angles (and for just about everything I make).
Step 8:
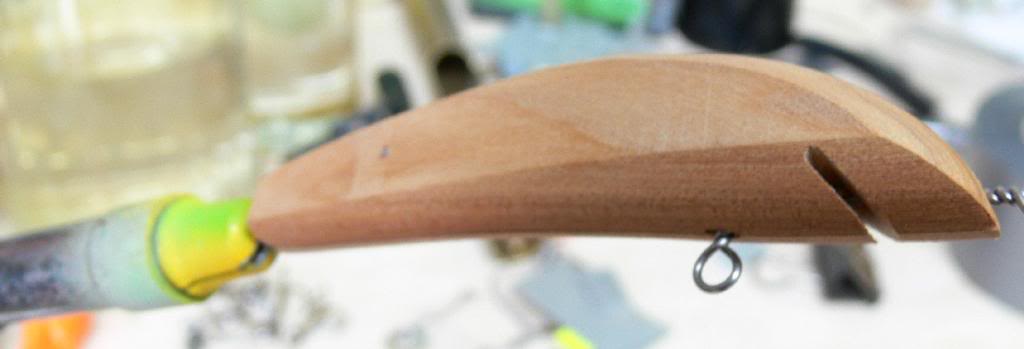
Right, you have sanded your bait down and you like it - now is a good time to fine sand it, while the wire is not in the way don't bother doing around the joint , because you will have to do it again when you later glue it up.
Step 9:
When you finish sanding, insert a small flat screw driver in the rear hanger hole and gently pries the two halves apart, don't remove the pins from the halves.
Put your wire in the slots you have routed, with any weight you want to
add (maybe lay soldering wire along the slot), organize how you are
going to clamp the halves after gluing (vice, tape, paper clamps etc),
mix up some Devcon 2 Ton or Araldite etc (30 min, not 5 minute) and spread over the wire and lure halves, then line up the pins/nails, (you did not remove), press together making sure there is no glue in the bib slot and get it ready to clamp. You
should find the halves line up close to perfect; you may have to giggle
the wire a bit here, so it all lays snug in the slots. Wipe off excess
glue with denatured alcohol (methylated spirits) and let it set, it's best to hang it on a drying wheel if you have one, so the glue does not run from the holes. If the wire gets in the way when you insert the lip, punch or drill a large hole in the lip to allow clearance.
Have fun. Pete Rayner - Rayna Lures
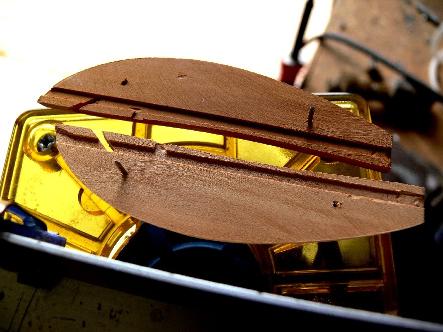
Step 3:
Sort them into opposing pairs and maybe number them and mark the end you will be using for the lip. It's essential to get the lip ends square here, for when you have to cut the lip slot later. Now get your lure profile and outline it on the lure, with the profile (lip end) starting right at that end of the blank.
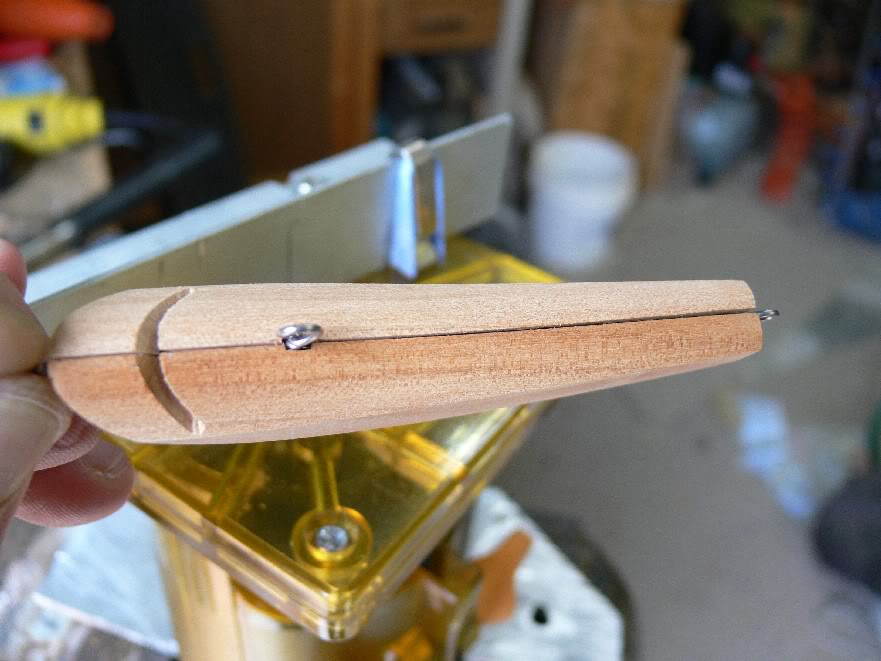
Lip slot, harness grooves are done and it is all pinned together and coincidentally, if you normally place the lip in before you start painting, you have a nice centre line to eyeball with.You should now be ready to sand the lure to shape.
Step 7:
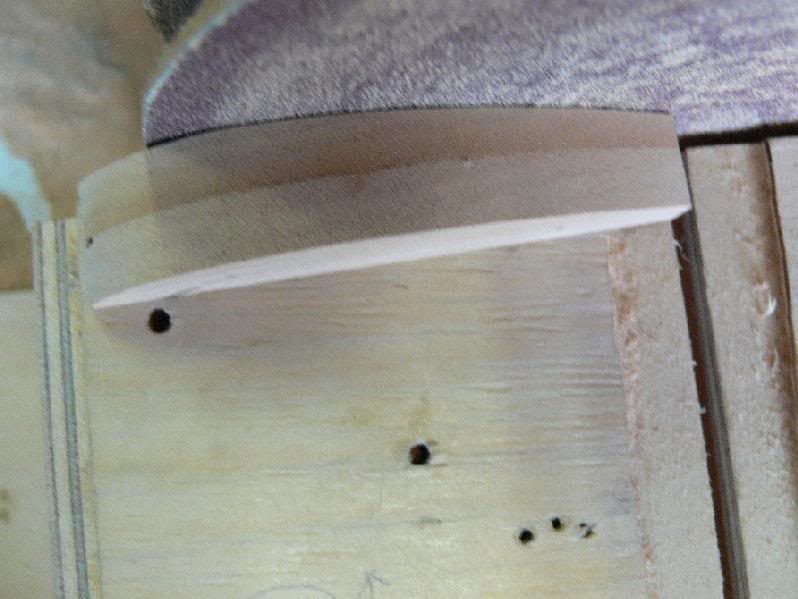
I use a disc sander I made with a motor from a free standing (i.e. portable) evaporative cooler (not sure what you call them there), I picked it up at the rubbish tip for $10. Just pull the pelton fan blades off both ends of the motor and you have a low revving 4 speed double shafted SEALED electric motor. They are usually, 3 or 4 speed (about 250 rpm max); the motors are sealed, so no sparks/arching (sealed because they operate in a very humid atmosphere), a shaft comes off both sides of the motor, so you can put a disc on both ends (fine & coarse)!!!!!!!!!!!!!!!!!!!!!!!.